实践 Vue3 组件库-基于 Vitest/VTU 的组件单元测试(组件篇二)
简单解释一下单元测试:就是对函数的输入输出进行测试,判断我们输入的用例的结果和我们实际输入的结果是否相同。平常工作中就会写一些测试可能不是系统性的,比如测试一个函数的返回值是否正确。
// 实现
function sum(a, b) {
  return a + b;
}
// 测试
function test() {
  if (sum(1, 1) !== 2) {
    throw new Error("sum(1, 1) did not return 2");
  }
}
test();
下面我们搭建一个系统性的单元测试,本篇新增的完整代码可查看单独的分支 ui-test。
如果你还不了解这个系列要做什么,那你可以先阅读 【实践 Vue3 组件库-介绍一下这个系列】 的介绍,以便你对整个系列有清晰的认识。
前置文章
你需要先阅读以下文章。
环境配置
我们基于 vitest 和 vtu 做测试我们先把相关的依赖和环境配置好。
# 前置依赖
pnpm add vite vitest -D --filter @bfehub/vlib-ui

# Vue 语法插件
pnpm add @vitejs/plugin-vue @vitejs/plugin-vue-jsx unplugin-vue-define-options -D --filter @bfehub/vlib-ui

# Vue 测试环境
pnpm add @vue/test-utils happy-dom -D --filter @bfehub/vlib-ui

# Vitest 网页界面
pnpm add @vitest/ui -D --filter @bfehub/vlib-ui

# 测试覆盖率
pnpm add @vitest/coverage-c8 -D --filter @bfehub/vlib-ui
在 package.json 加入以下的脚本命令。
// packages/vlib-ui/package.json
{
  "scripts": {
    "test": "vitest",
    "test:ui": "vitest --ui",
    "test:coverage": "vitest run --coverage"
  }
}
在 vitest.config.ts 中配置环境和插件。
// packages/vlib-ui/vitest.config.ts
import { defineConfig } from "vitest/config";
import vue from "@vitejs/plugin-vue";
import vueJsx from "@vitejs/plugin-vue-jsx";
import vueDefineOptions from "unplugin-vue-define-options/vite";

// https://cn.vitest.dev/config/
export default defineConfig({
  plugins: [vueDefineOptions(), vue(), vueJsx()],
  optimizeDeps: {
    disabled: true,
  },
  test: {
    clearMocks: true,
    environment: "happy-dom",
    transformMode: {
      web: [/\.[jt]sx$/],
    },
  },
});
基本使用
使用 vitest 只需优先记住三类方法的用法即可。
describe:将相关的测试组合在一起(可以任意的嵌套和分组,一般一个文件定义一个主标题)。test:包含一组断言方法(也可以认为分组,一般是一个分支或一个功能的测试)。expect:一个断言(可以理解为判断,是对一个值或状态的具体判断)。
我们开头说的 sum 方法用这些方法就可以改写为。
import { describe, test, expect } from "vitest";
describe("Sum", () => {
  test("测试数字相加", () => {
    expect(sum(1, 1)).toBe(2);

    expect(sum(0.1, 0.2)).toBeCloseTo(0.3);
  });

  test("测试字符串相加", () => {
    expect(sum("1", "1")).toBe("11");
  });
});
使用 vtu 建议跟着官网的案例走一遍,了解常用的 mount、find、emitted、trigger 等测试方法。刚开始写测试会有一种无法下手的感觉,不知道怎么写或者不会写。这时我们可以去参考开源组件库类似的组件慢慢就熟悉了。
import { mount } from "@vue/test-utils";

// The component to test
const MessageComponent = {
  template: "<p>{{ msg }}</p>",
  props: ["msg"],
};

test("displays message", () => {
  const wrapper = mount(MessageComponent, {
    props: {
      msg: "Hello world",
    },
  });

  // Assert the rendered text of the component
  expect(wrapper.text()).toContain("Hello world");
});
测试组件
我们是新手肯定是先写组件后写测试,还可以看着组件渲染的效果写。

在组件的目录下,我们新建一个 __tests__/back-top.test.tsx,使用 tsx 的原因是挂载组件比较方便。
// packages/vlib-ui/src/back-top/__tests__/back-top.test.tsx
import { nextTick } from "vue";
import { mount } from "@vue/test-utils";
import { describe, test, expect } from "vitest";
import { BackTop } from "../index";
我们要为 BackTop 组件写测试,使用 describe 定义个分组。
describe("BackTop.vue", () => {});
我们要测试 BackTop 的渲染是否正确,使用 test 定义个测试。
describe("BackTop.vue", () => {
  test("render", async () => {});
});
第一步先把要测试的组件 BackTop 挂载上。
describe("BackTop.vue", () => {
  test("render", async () => {
    // 挂载组件
    const wrapper = mount(
      () => (
        <div class="target" style="height: 100px; overflow: auto">
          <div style="height: 10000px; width: 100%">
            <BackTop target=".target" visibilityHeight={2000} right={100} bottom={200} />
          </div>
        </div>
      ),
      { attachTo: document.body }
    );
    await nextTick();
  });
});
接下来我们写很多的断言,判断当前的状态和事件是否正确。
describe("BackTop.vue", () => {
  test("render", async () => {
    // ...

    // 初始化时元素隐藏
    expect(wrapper.find(".vlib-back-top").exists()).toBe(false);

    // 滚动到 2000 之后元素显示
    wrapper.element.scrollTop = 2000;
    await wrapper.trigger("scroll");
    expect(wrapper.find(".vlib-back-top").exists()).toBe(true);

    // 验证 props 是否渲染正确
    expect(wrapper.find(".vlib-back-top").attributes("style")).toBe("right: 100px; bottom: 200px;");

    // 点击返回触发 click 事件
    await wrapper.trigger("click");
    expect(wrapper.emitted("click")).toBeDefined();
  });
});
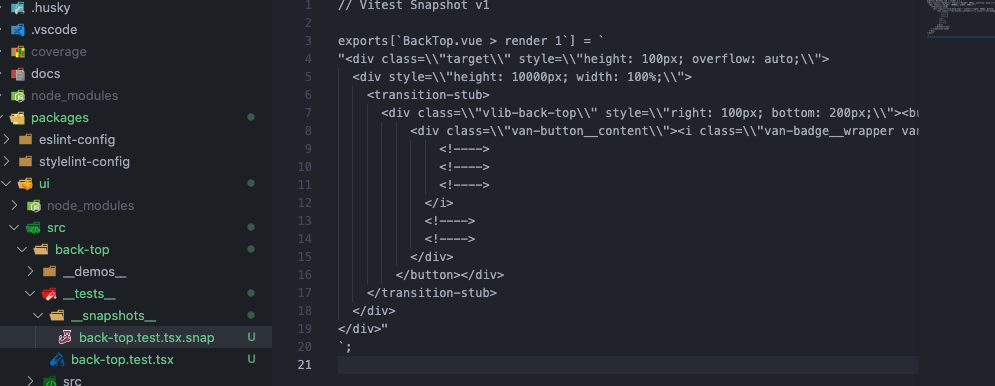
最后输出快照查看整体的 DOM 结构渲染结果。
describe("BackTop.vue", () => {
  test("render", async () => {
    // ...

    // 输出快照到单独的文件
    expect(wrapper.html()).toMatchSnapshot();
  });
});
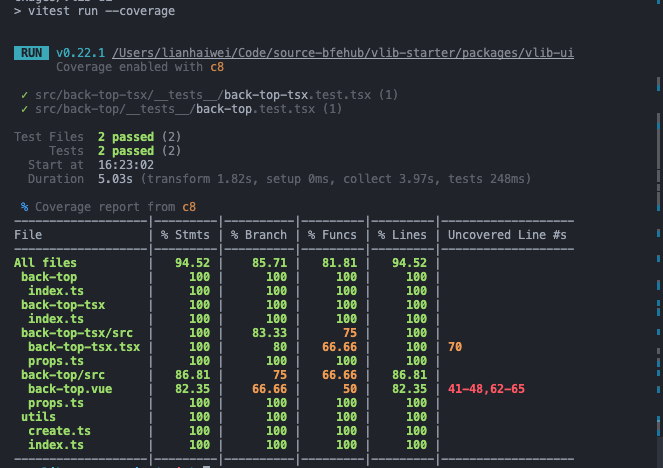
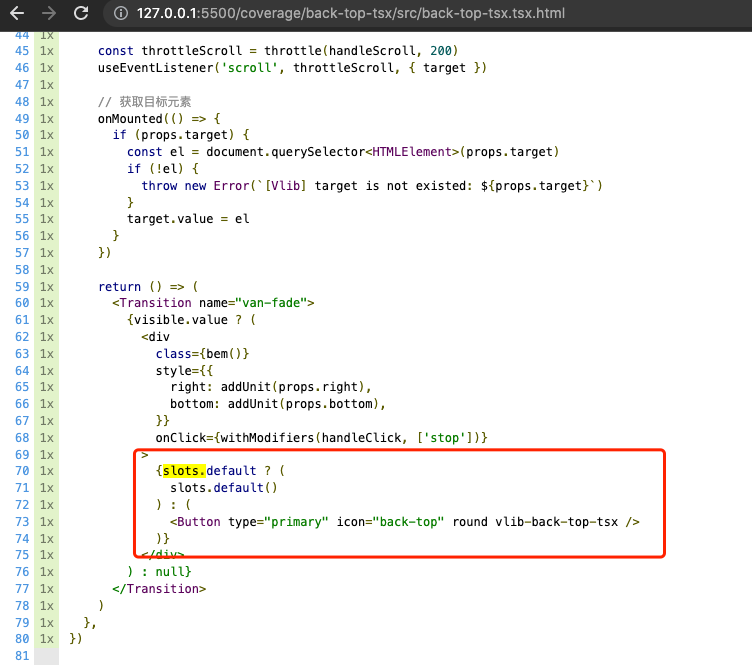
运行 pnpm run test:coverage 测试并输出测试报告,打开 coverage/index.html 可以看到测试情况。由于 sfc 的组件测试不到 v-if 分支,之前还写了 tsx 版本的,可以看到当传入 slot 时这个分支没有测试到,那么接下来就可以继续添加一个测试提升覆盖率。
describe("BackTop.vue", () => {
  test("render slot", async () => {
    // 你可以自己实现...
  });
});
你可以...
你可以根据本章内容自己实现一遍完善我们的组件库。
你可以补充未完成的测试完善覆盖率。
如果对你有帮助可以点个 赞 和 关注 以示鼓励。